

Table of Contents
Table of contents
Your printer asks for the file “with 3mm bleed”. Bleed and trim exist for one reason: printing cannot cut exactly on a line, so you give the blade extra to cut into.
Why any of this exists
Printed items are not made one at a time at final size. Many are printed on a large sheet, then a guillotine cuts through the stack.
Paper shifts. Blades flex. Stacks compress unevenly. The cut lands within about a millimetre of where it was meant to, which is impressive engineering and not perfect.
If your background stopped exactly at the intended edge and the blade came down half a millimetre outside it, you get a thin white line along one side. Bleed exists to make that impossible.
Bleed and trim and the three measurements
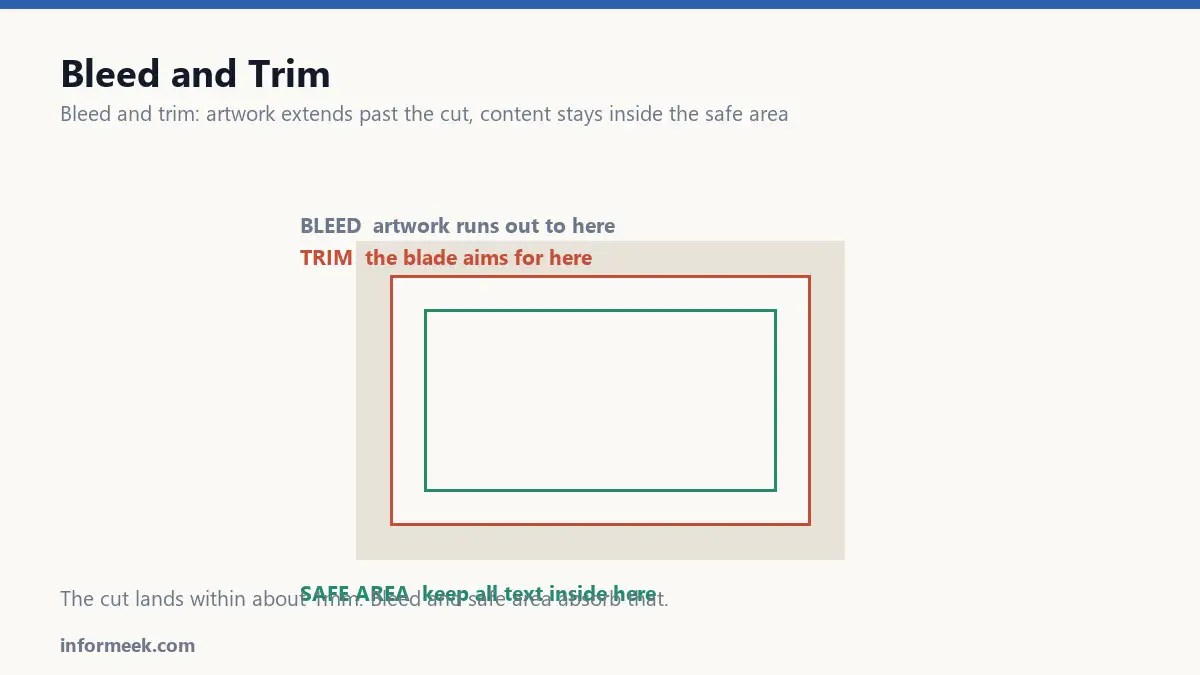
Trim is the finished size. An A5 flyer trims to 148 x 210mm. This is the line the blade is aiming for.
Bleed is extra artwork beyond the trim, usually 3mm on each side. Any background, image or colour meant to reach the edge must extend into it. It will be cut off, and that is the point.
Safe area is a margin inside the trim, typically 3 to 5mm, where nothing important goes. Text and logos sit inside it, so that if the cut drifts inward, nothing is clipped.
Together: artwork extends 3mm past the edge, content stays 3mm inside it, and the cut lands somewhere in that forgiving band.
Setting it up
- Create the document at trim size, not bleed size. This catches people out constantly.
- Set bleed in the document settings, usually 3mm all round. The software adds it outside your page.
- Pull background elements out to the bleed line, not the page edge.
- Add guides at 3 to 5mm inside the page and keep all text within them.
- Export as PDF with “use document bleed settings” ticked, and crop marks on if asked for.
The most common error is making the document 154 x 216mm because that includes the bleed. Now the printer’s trim marks are in the wrong place and everything shifts.
How much bleed
- 3mm is standard across most of the world for flyers, cards and brochures.
- 0.125 inch is the US equivalent, near enough the same.
- 5mm or more for large format, thick stock, and anything folded or bound.
- Ask for packaging, which uses a die line and has its own rules entirely.
When in doubt, ask the printer before you design rather than after. They will send a template, and a template removes the entire problem.
Things that go wrong
Borders. A thin frame around the edge is the least forgiving design there is. A cut that drifts half a millimetre makes one side visibly thinner than the other. It will look like a mistake even though the printing was within tolerance. Either avoid edge borders or make them thick enough that a millimetre does not show.
Images that stop short. A photo dragged to the page edge rather than the bleed edge gives you the white line you were trying to avoid.
Text too close. Anything within 2mm of the trim will eventually be clipped on some copies.
Bleed on a folded item. Folding has its own tolerance on top of cutting, so allowances need to be larger and the panels are not all the same width. A three-panel leaflet has one panel deliberately narrower so it tucks inside.
The check before you send
Open your exported PDF and look at it as the printer will.
The artwork should visibly extend past the crop marks on all four sides. If it stops neatly at them, the bleed did not export, whatever your document settings said.
That thirty second check catches most reprints before they happen.
A worked example
An A5 flyer, 148 x 210mm finished.
Create the document at exactly 148 x 210mm. Not 154 x 216mm, which is the error that shifts everything.
Set bleed to 3mm in the document settings. The software adds it outside the page, so your background image now extends to 154 x 216mm total while the page stays 148 x 210mm.
Place guides 4mm inside the page edge. All text lives inside those guides, so nothing sits closer than 4mm to where the blade will land.
Export as PDF with document bleed settings enabled and crop marks on. Open the result: artwork should visibly run past the crop marks on all four sides.
Mistakes that cause reprints
- Building the document at bleed size. The trim marks then sit in the wrong place.
- Dragging a background to the page edge rather than the bleed edge, leaving the white line you were trying to prevent.
- A thin border around the edge. The least forgiving design there is, since a millimetre of drift makes one side visibly thinner.
- Exporting without bleed. Document settings mean nothing if the export dialogue does not include them.
- Forgetting folds. Folding has its own tolerance on top of cutting, and panels on a folded leaflet are not all equal width.
Common questions
What if my design has a white background? You still need bleed if anything reaches the edge, but a genuinely white page can sometimes be supplied without it. Ask rather than assume, because many printers require bleed regardless for handling.
How much bleed for a booklet? Usually more than 3mm, and the inner margin needs extra allowance for the binding, which pulls pages inward. Ask for a template.
Do crop marks need to be on? Most commercial printers want them, most online printers do not because their system positions artwork automatically. Follow their specification rather than a general rule.
Why did my text get cut off? Almost always because it sat inside the trim but outside the safe area. Cutting tolerance is about a millimetre, and anything within 2mm of the edge will be clipped on some copies of the run.
Related reading
Continue with Brand Identity Elements, Business Card Design, Print Resolution. For the underlying standard, see ISO 12647 for print process control.



Join the discussion